Sunday, March 27, 2011

Roast Pork Shoulder and Potato-Gruyère Galette


In May, Rachel and I will be moving out of our NYC apartment and moving across the Hudson to New Jersey.  We’ll definitely miss living in Manhattan, with all its markets, amazing culinary shops…not to mention the restaurants.  Anyway, one of our current challenges is in our freezer.  As a CSA member of 8 O’clock Ranch in upstate New York, we have a freezer full of lamb, pork, and beef that needs to be consumed before we move out. 

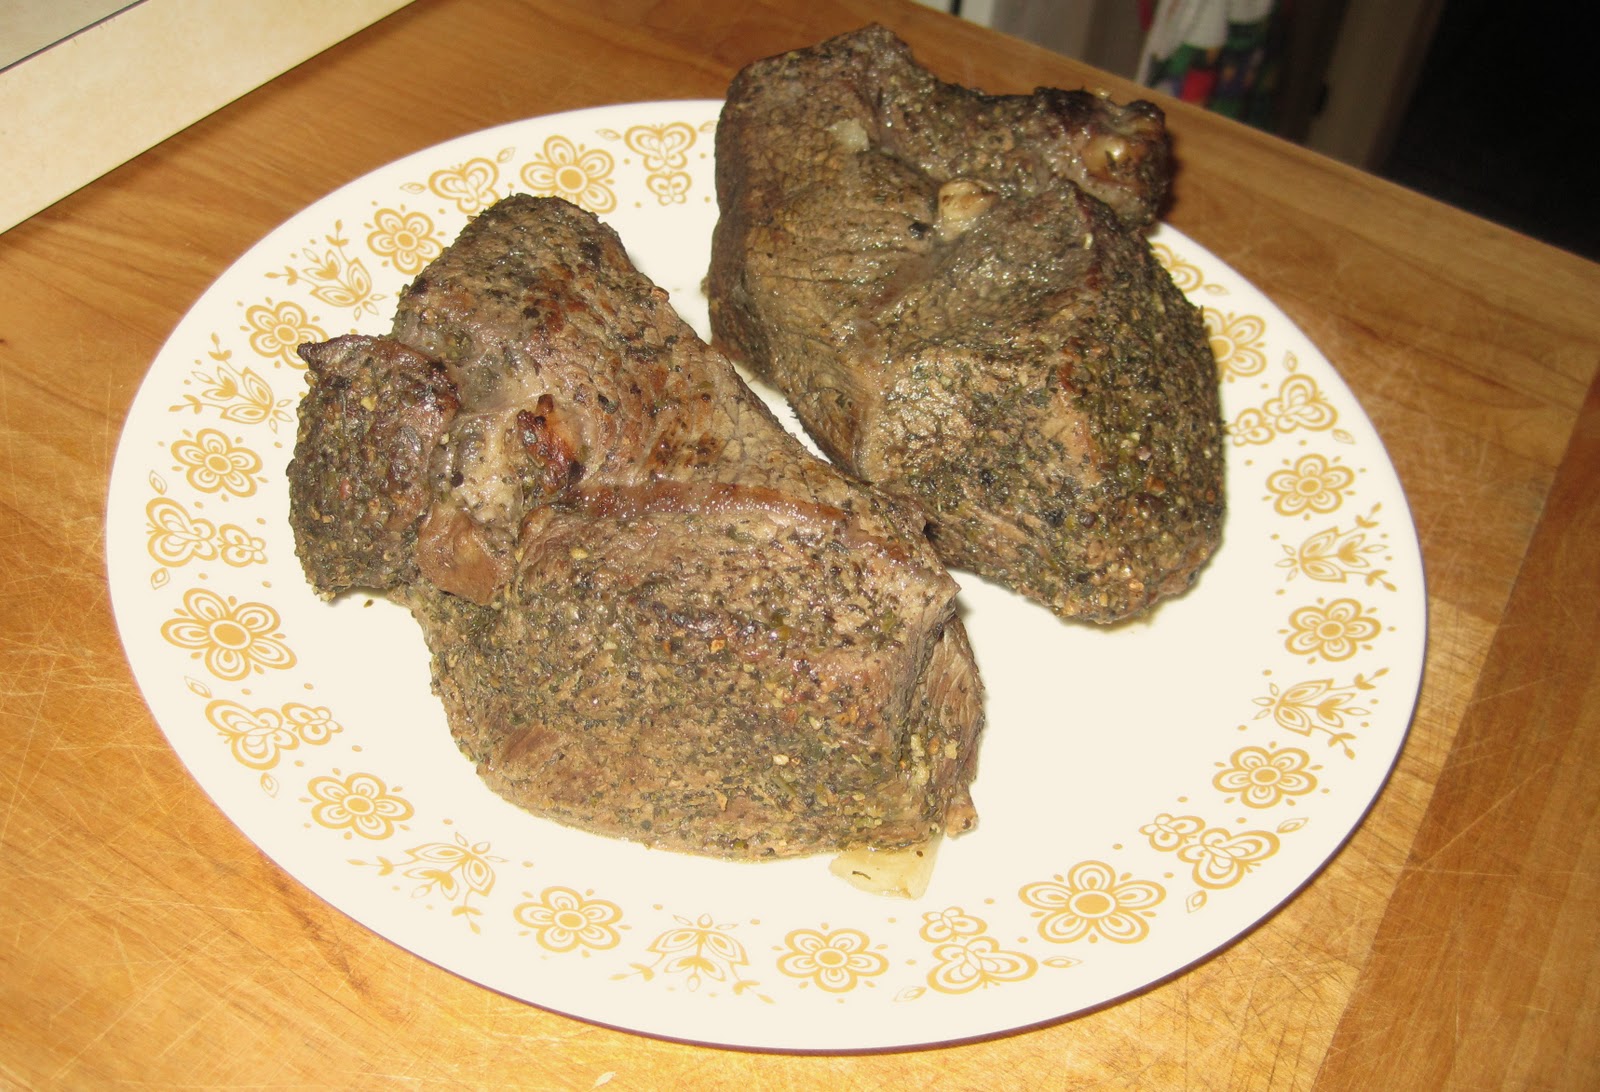
With only a couple months to go, I’ve been trying to find new and delicious ways to cook up the different cuts of meat.  Last week, I pulled out a pair of pork shoulder steaks (bone-in).  I love slow-roasting pork at very low temperatures, allowing it to break down into tender, juicy bites that fall apart with just a fork.  It does take a lot of time, typically 6-10 hours, depending on the cut, temperature, and size of the meat.  But it sure is worth it.  Sometimes I’ll cook it overnight, which ends up leaving me dreaming about food while I’m sleeping.


Adding the sherry and shallots to the pan
To spice up the pork last week, I used a combination of fennel seeds, juniper berries, black pepper, sumac berries, and olive oil.  I ground the spices in my Magic Bullet, which I love.  Then I drizzled some spicy Tuscan olive oil on the pork, tossed on the spice mix, and rubbed it into the meat.  In a ceramic baking dish, I placed a layer of carrots.  To help the pork stay juicy, I seared it first on the stove and then added some sliced shallots and sherry at the end to give it some extra flavor.  From there, it all went on top of the carrots in my dish.  I added a little white wine and a bit more sherry, covered it with a lid, and placed it in the oven.  One of my favorite parts is the aromas that come out of the oven over the next several hours.  Yum.


Also, I highly recommend brining the pork for a few hours before roasting.  It helps keep the pork even juicier and allows for some really complex flavors to seep into the meat itself.  For pork and chicken, I always brine unless I am short on time.


Pork Shoulder from 8 O'clock Ranch (NY)
While the pork was baking, I looked in my fridge to settle on the sides.  I saw that there was a chunk of Gruyere cheese (you could also use Provolone cheese, which is a lot cheaper than Gruyere), a little bacon, and fresh herbs.  I sliced a few gold potatoes, and layered them with grated Gruyere and Parmigiano-Reggiano, along with thyme, rosemary, and olive oil.  I also placed a layer of bacon on the bottom of the dish to give it a little smokiness.  My recipe was inspired by Chris, a fellow blogger that writes the Pantry Raid, a fun blog on creative cooking.  It looks like she hasn’t blogged in a year or so, but she has some great recipes on her site.


View from Artesa Winery in Napa, CA (Los Carneros AVA)

To drink, I popped a 2005 Artesa Merlot Reserve from Napa.  The soft red fruit, firm acidity, and slight earthiness of the Merlot paired very well with the fennel and juniper flavors of the pork.  Artesa Winery makes some great red wine (Cab Sauv, Merlot, and Pinots are all superb).  Their Chardonnay and Sauvignon Blanc are good too…but only if you love the big, oaky California style. 

Enjoy!


Roasted Pork Shoulder

Ingredients:
1 to 1.5 lbs pork shoulder steaks (previously brined, rinsed, and dried)
2 carrots, cut into 3” sticks
2 shallots, finely sliced
2 T. white wine
¼ cup sherry, divided into two 2 T. portions
Olive oil

Spice mix:
  2 T. whole juniper berries
  1 T. fennel seeds
  1 tsp. black pepper
  ¼ tsp. ground sumac berries (or you could substitute lemon zest)


Directions*:
1. Brine the pork for 2-3 hours (add some juniper berries and whole allspice to the brine)
2. Preheat the oven to 200 F
3. Mix spices together in a food processor and grind into a powder
4. Drizzle the pork shoulder with olive oil, rubbing it into the meat
5. Add spice mix to the pork, rubbing it into the meat, ensuring it is well coated
6. Heat a grill or skillet to medium and add a little olive oil to the pan
7. Sear the pork on both sides, about 3-4 minutes per side, or until slightly browned
8. Add the shallots and half the sherry, using the sherry to deglaze the pan
9. Place the carrots in a baking dish with high sides (I use a 2 ½ quart Corningware dish)
10. Add the pork and shallots to the dish, layering on top of the carrots
11. Add the remaining sherry and white wine
12. Roast, covered, for about 6-8 hours, or until it easily shreds with a fork
13. Remove from the oven, pull out pork and carrots separately, careful to not mash the carrots
14. Serve

*Note – if you brined the pork, you shouldn’t need to add any salt


Potato and Gruyère Galette

Ingredients:
4 medium yellow potatoes, sliced in ¼” slices
2 slices bacon, cut into 1” pieces
1 T. fresh thyme, minced
1 T. fresh rosemary, minced
¼ cup Gruyere cheese, shredded (or sub Provolone)
2 T. Parmigiano-Reggiano cheese, shredded
Olive oil
Salt & Pepper


Directions:
1. In a ceramic baking dish (such as another Corningware casserole dish), place the bacon on bottom
2. Add a layer of potatoes
3. Drizzle with olive oil, top with salt, pepper, and a sprinkle of fresh herbs
4. Add a layer of Gruyère and Parmigiano-Reggiano
5. Repeat until you finish with one last layer of potatoes on top, then drizzle with olive oil, add salt & pepper, and a dash of the herbs (I didn’t put any cheese on top)
6. If cooking along the pork, roast at 200 F for about 90 minutes.  If roasting separately or with another dish, roast at 350 F for about 45-60 minutes.  The potatoes should be soft and slightly browned.


Tuesday, March 1, 2011

Baking Challenge: Croissants


From talking to other people that also love to be in the kitchen, I feel we generally fall into two categories: those who love to cook and those who love to bake.  For whatever reason, it seems to be rare that someone is interested in both.  My theory is that cooking attracts those who enjoy more free-form expression, adding a little of this and a dash of that.  Conversely, bakers are those who love structure and appreciate a recipe, treating the entire process as a scientific process where each and every ingredient is carefully measured.  I mean, you can’t just throw in a bit of yeast or water when baking bread. 


Realizing how little I knew about baking, I decided to venture into this more structured universe, away from my comfort zone of cooking.  Starting with simple things, such as a basic yeast bread, buttermilk biscuits (see my Beef Stew and Buttermilk Biscuits entry), and pizza dough, I began to appreciate the art of baking.  Of course I made mistakes, and I continue to learn a lot about baking. 


For example, when making biscuits, it’s critical to not over-mix the dough.  Otherwise the biscuits become dense and lose their delicious flakiness.  With pie crust, there is a careful balance between lard, water, and flour.  The perfect angel food cake is all about whipping the egg whites just enough to form the proper peaks. 


Seeking a challenge, I decided to bake homemade croissants and pain au chocolat (bread with chocolate).  This was one of the most difficult dishes I’ve ever attempted.  Croissant dough requires careful folding, rolling, and refolding layers of dough and butter, always keeping it at a cool enough temperature to prevent the butter from liquefying.  More than once I had to place the dough in the fridge when the butter oozed out.


All the work was totally worth it.  The croissants were flaky and absolutely decadent.  The pain au chocolat was superb, with bittersweet chocolate cradled within a roll of croissant dough.  Yum.  If you want to make the pain au chocolat, simply make the croissant dough (see recipe below), and roll the dough into a large square.  Then cut individual 4" squares, drop in a dozen bittersweet chocolate chips, and roll them up (see picture above).

Make sure you have plenty of counter space, a good rolling pin, and a bit of patience.  Also remember to use unsalted butter.  The recipe is challenging, and very intricate.  It's helpful to read through the entire thing before starting out.

Bon appétit!


Recipe (from Joy of Cooking, 75th Anniversary edition)


Sunday, February 6, 2011

Caribbean Cuisine


Jerk-style braised pork, mango-tomato salad, roasted sweet potato with red bell pepper sauce, and mashed plantains

Sometimes a recipe just doesn’t turn out well.  While it is certainly disappointing, and often frustrating, it happens to everyone.  So don’t get discouraged!  Last week, I was in the mood for venturing into a new cuisine, and I thought Caribbean would be fun.  A beautiful combination of sweet, spicy, and savory, Caribbean food brought to mind images of Jerk chicken, grilled pineapple, fried plantains, and rice and beans, not to mention pristine beaches and aqua waters.

While a Google search on Italian, French, or burgers brings up thousands of websites, I struggled to find good Caribbean recipes.  There were plenty of websites featuring Caribbean fare, but many lacked either the credibility or the appeal of a well-crafted recipe.  Eventually, I fell back on my favorite site, Food & Wine, and discovered a nice variety of Caribbean dishes.  My main dish for the meal would be something with pork because I had about a pound of pork stew meat from 8 O’Clock Ranch in NY that I wanted to use.

Avocado-jalapeño salad (sort of a deconstructed guacamole)
The side dishes I found on F&W’s website all looked so delicious, and it was impossible to choose which ones to make.  Ultimately, I gave up and decided to make all four of them.  They were all easy to make, some only requiring ten minutes, so it wasn’t as daunting as it might sound.  Also, Rachel & I love variety in a meal.  Lastly, with all of these recipes new to me, I figured even if one or two didn't knock it out of the park, the others might.


What is unique about Caribbean food is its origins.  While many regions and countries around the world have multiple influences on their modern day cuisine, Caribbean food is the mutt of all mutts.  This fascinating food represents the marriage of African, French, English, Spanish, and even Asian ingredients, techniques, and traditions.  The famous Jerk seasoning is a delicious blend of baking spices, such as allspice, cinnamon, nutmeg, and clove, and spice from fiery-hot peppers.  Lime, garlic, rice, beans, chicken, and pork are all commonly used ingredients.  But so are interesting things such as coconut, tomatoes, papaya, goat, and ginger. 


The influences are not hard to see when looking at the region’s dynamic history.  Following Christopher Columbus’s European discovery of the ‘New World’ in 1492, it was only a matter of time before imperialism followed him.  By the 1700s, nearly every scrap of land in the Caribbean (and for that matter, the entire ‘New World’) had been claimed by the European powers, each jockeying for power in the ever-expanding geopolitical arena. 

As far north as Florida and Mexico to the southern countries of Chile and Argentina, the Spanish excelled at colonizing the Americas, to the extreme misfortune of the native inhabitants.  The Caribbean was no different, with the Spanish controlling many of the islands, including Cuba, Puerto Rico, the Dominican Republic.   Meanwhile, the French and British pushed to control many of the smaller islands.  The French controlled the western half of Hispaniola, which later became Haiti (the other half is the Dominican Republic), along with Martinique, Turks & Caicos, and St. Lucia.  The British, being the British, always seemed to push to control key strategic ports and waterways.  They pushed to control large tracks of the Central American coastline, the Bahamas, Jamaica, the Cayman Islands, and the modern day British Virgin Islands.


The African roots in the Caribbean, unfortunately, come almost entirely through the slave trade.  In the 16th and 17th centuries, and even through the mid-19th century, millions of enslaved Africans were shipped from their homeland to the ‘New World.’  The slaves made up the workforce for expanding agricultural and mining enterprises.  In the Caribbean, slaves were first brought to work the sugar cane farms.  Later, they were also forced to farm coffee, cotton, and tobacco.

Back to the food.  The jerk pork had excellent flavor, but the pork became kind of dry during the hours of braising (I think I used too much water).  I won’t bother passing on the recipe.  Fortunately, a couple of the side dishes were absolutely delicious.  The mango-tomato salad, avocado & jalapeño salad (essentially deconstructed guacamole), and mashed plantains were all very good.  I posted these three recipes below, all of which came from Food & Wine.

Mango-tomato salad with fresh basil


I hope you enjoy these Caribbean dishes.  They’re the hard work of centuries of different cultures from around the world, all neatly blended into a meal.


Mashed Plantains (based on F&W recipe)
Serves 4

Ingredients:
2 large, ripe plantains, peeled and cut into 1” pieces
2 cups water
2 jalapeños, minced
1 large garlic clove, minced
1 ½ T. unsalted butter
¼ cup sweet onion, diced
Salt to taste

Directions:
1. After mincing the garlic and jalapeños, mash into a paste using a mortar & pestle or the back of a spoon.
2. Place the plantains and water in a medium sauce pan, and turn the heat to high.
3. Boil the plantains, covered, for about 10 minutes.
4. Remove the lid, and continue to boil for another 10-15 minutes, or until most of the water has evaporated.
5. While the plantains are boiling, heat a small skillet to medium.  Add the butter.
6. Once hot, add the jalapeño-garlic paste.  Sauté for 1-2 minutes, or until it begins to brown.
7. Add the onions, stir, and sauté for 5 minutes, or until the onions start to brown.
8. When the plantains and onion mixture are both ready, mix together, mashing the plantains much like mashed potatoes.  If you want it even more homogenous or whipped, you could place in bowl and use a hand mixer.
9. Serve hot.


Mango-Tomato Salad (based on F&W recipe)
Serves 4

Ingredients:
2 T red wine vinegar
2 T extra-virgin olive oil
1 large shallot, thinly sliced
1/3 cup fresh basil leaves, thinly sliced
2 medium tomatoes, sliced ¼” thick
1 large, ripe mango—peeled, pitted and sliced ¼” thick
Salt to taste

Directions:
1. In a small bowl, mix together the vinegar, oil, shallots, and basil
2. On a large plate, mix tomato and mango together, then spread out on the plate
3. Sprinkle with salt
4. Spoon dressing over the tomato and mango
5. Serve immediately


Avocado-Jalapeño Salad (based on F&W recipe)
Serves 4

Ingredients:
2 avocadoes, halved, pitted, and cut into ¼” strips
¼ to ½ lime, juiced
1 large jalapeño, thinly sliced
2-3 T cilantro, roughly chopped
Salt to taste


Directions:
1. On a plate, arrange strips of avocado in a circle (or whatever shape you like)
2. Sprinkle with lime juice and salt to your taste
3. Add jalapeño slices, then top with cilantro
4. Serve immediately


Tuesday, January 25, 2011

Time for Thai

Chicken with Basil
Visiting our friend in Los Angeles a couple weeks ago, Rachel & I had the privilege of learning a traditional Thai recipe from our friend's father.  Originally from Thailand, her father, Charlie, loves his country's cuisine, which was apparent throughout his exciting cooking lesson.  The dish was chicken with basil, one of our favorite dishes from one of our favorite cuisines.


My teacher, Charlie, and me
Charlie started the lesson by explaining the importance of high-quality, fresh ingredients.  He showed me the proper fish sauce, soy sauce, and the basil that he bought earlier that day at their local Asian market outside of LA.  The recipe, he explained, was like many Thai dishes...very simple, based only on a few key ingredients, and easy to make.  Of course, like any fast-cooking stir-fry dish, it's important to prep everything before you begin.  Cooking steps are so brief that you won't have time to clean, cut, or prep anything mid-way through.


In this particular recipe, the flavor comes from the garlic, peppers, fish sauce, soy sauce, and basil.  Lots and lots of fresh, delicious, aromatic basil.  Another interesting tip from Charlie was the use of ground chicken rather than chunks of breast or thigh.  This texture allowed for more of the sauce, garlic, and peppers to coat the chicken.


Garlic and peppers in the mortar & pestle

Charlie stressed the importance of the chef actually tasting the dish as it cooked.  A recipe is only a guide, and the chef needs to taste the food to decide if extra fish sauce, soy sauce, sugar, or even peppers should be added.  His/her tastes, or the tastes of the guests, may dictate slightly different levels of these ingredients.  So remember this lesson when making your Asian dishes (or for that matter, any cuisine).


Thailand, for those not familiar with this beautiful country, is located in Southeast Asia, not too far north of the equator.  Burma (or Myanmar) to the west, Laos and Cambodia to the east & north, and Malaysia to the south, Thailand is one of many countries in this region with delicious food.  But for one reason or another, many Thai dishes offer more pronounced flavor than its regional counterparts.  Perhaps this is the reason that its cuisine can now be found in cities throughout the world.  Or maybe the Thai government did a good job marketing it.


Enjoy!  I recommend serving with beer, or a sweet white wine (Riesling, Gewurtztraminer).  While white rice seems to be more traditional, you can also serve with brown rice for a healthier option.  Another nice addition would be a serving of papaya salad or a delicious, spicy Thai soup.


Ingredients:
1 lb. chicken, ground (or finely minced with a knife)
8 cloves garlic, finely diced
3 to 5 bird/Thai chilies, minced
1 cup long bean (or green beans), diced*
1 T. fish sauce, or more to taste
1 T. soy sauce, or more to taste
1/2 tsp. sugar, or more to taste
1 cup packed Thai basil
3 T. vegetable oil

*May substitute Thai eggplant


Directions:
1. Using a mortar & pestle, grind the garlic and peppers into a rough paste (you can also use a food processor, but the mortar & pestle is preferred)
2. Heat a wok to high heat, add the vegetable oil
3. Once hot, toss in the garlic-pepper paste, stirring quickly to coat it in the oil
4. Saute for 30 seconds
5. Add the chicken, stirring well
6. Saute for 3-4 minutes, or until the chicken is cooked through
7. Add the fish sauce and soy sauce, stir
8. Saute for another 2-3 minutes; taste to see if additional soy or fish sauce is needed
9. Add sugar, stir
10. Add beans (or eggplant), stir
11. Saute for 1-2 minutes
12. Add basil, stir
13. Taste again for soy sauce, fish sauce, and sugar.  Also see if you want it spicier, and add more peppers if necessary.
14. Turn off heat, serve with steamed rice


Saturday, January 8, 2011

Scalloped Potatoes & Ham: A Betty Crocker Classic


Scalloped Potatoes and Ham
A few weeks back, Rachel & I had some friends coming over for a dinner party.  From 8 O'Clock Ranch, our CSA (Community Supported Agriculture) in upstate New York, we had a beautiful fresh ham in the freezer.  Fresh ham might seem a little odd at first because the vast majority of ham sold in the grocery store has been cured, smoked, or both.  Fresh ham, if cooked without curing or smoking, is not too different from a roast pork loin (except it's from the leg rather than the back of the pig).  If you decide to cook the scalloped potatoes and ham recipe, you can buy a Smithfield or similar pre-cooked country ham.


With a 4-pound ham and seven people, I thought it would be fun to do a ham themed meal.  Rachel & I would serve three courses, each using the cooked ham (I cooked it ahead of time).  The first course was slices of multi-grain bread, topped with a sweet Bourbon mustard, thinly cut ham, a thick slice of Swiss cheese, and a mayo-based red cabbage & apple slaw.  Yum!


The second course was a yellow split pea soup, which of course depends heavily on the rich ham flavor.  It's difficult to make a good split pea soup without pork. 

I found this particular recipe on Food Network's website.  Here's the recipe link: Ham & Split Pea Soup.  While searching for green split peas at my local Whole Foods, I came across yellow split peas.  In fact, Whole Foods didn't even carry green split peas for some strange reason.  Anyway, the yellow split peas are supposed to be more delicate and not quite as hearty as green split peas.  Plus, as one of our friends said, it looks a lot more appetizing than the famous off-putting green color of classic split pea soup. 

Patience is key with this recipe, so make sure you have plenty of time to cook the soup.  It took about three hours of cooking the soup on medium and several additional cups of water added to the pot as it reduced, before the split peas softened and broke down.  So plan ahead!


The third and main course was the scalloped potatoes and ham.  This is a recipe I have grown up with all my life.  It's perfect for reusing cooked ham from a big holiday or family gathering, which is how I often ate it as a child.  The salty ham, creamy white sauce, and thinly sliced potatoes deliver a wonderfully balanced flavor.  I cut the ham into thickly sliced, bite-sized pieces, but you could dice it if you prefer. 


To make the recipe, which is a Betty Crocker classic, you only need a handful of ingredients: onion, celery, milk, butter, flour, and of course, ham and potatoes. 

If you decide to use a fresh ham, I recommend  brining it for 10-12 hours before cooking.  Also, you should cook it the day before you plan on using it in the scalloped potatoes & ham recipe.  After all, it's meant for using leftover ham. 

So I hope you enjoy this childhood recipe.  While I almost always recommend a particular wine with a recipe, this one is best served with a tall glass of cold milk.  Yum!


Scalloped Potatoes Recipe (straight from the Betty Crocker cookbook):


The only change, as you might have noticed from scanning the recipe, is adding the ham.  Add about a 12 to 16 ounces of ham to the recipe, layering the ham in between the layers of potatoes and white sauce.  I also added a 1/2 tsp. of nutmeg to white sauce recipe.


Friday, December 24, 2010

A Roast to Remember


Christmas Roast - A Sirloin Tip Roast
On Christmas Eve, Rachel & I were back in Wisconsin in my hometown of Sussex staying with my parents for the holidays.  This December, there has been plenty of snow in the Midwest, so it definitely looked like (and felt like) winter outside.

My mom and I were thinking about what to cook for dinner for the four of us, and she found a boneless sirloin tip roast in the chest freezer, weighing about 3 1/2 pounds.  When you're only two people in a household, it's hard to find an occasion or the appetite to cook up such a large cut of meat.  And with the chilly weather and the holiday, a deliciously cooked roast sounded perfect!

The roast itself was from Kummrow Farms, a beautiful small farm near Oconomowoc, Wisconsin (the town's name was derived from coo-no-mo-wauk, the Potawatomi term for "waterfall").  Kummrow Farms feeds their cattle (and bison) almost entirely on grass and hay, and does not use hormones nor antibiotics.

Roast from Kummrow Farms

Back to the cooking.  Normally, I would bake the roast in one piece until its center is a beautiful juicy, deep red color.  However, my parents prefer their beef medium to medium-well.  To tailor dinner to all four of us, I cut the roast in half.  The first half (for my parents) went in the oven about 20 minutes before I added the second half. 


The seasoning for the roast was simple.  I used a combination of salt, fresh ground black pepper, and Penzey's Italian Herbs (rosemary, oregano, and thyme).  The spice mixture was rubbed onto all sides of the roast pieces.  Then I let the roast sit out on the counter, allowing it to warm to room temperature (about 25-30 minutes).


Once the meat was prepped, I added my potatoes, onions, and celery to the roasting pan.  Since the roast was quite lean (almost all the excess fat had been trimmed off), I added some rendered pork fat to the vegetables to ensure there was enough fat in the roasting pan to keep the beef from drying out and to give it that extra boost of flavor.  I placed the pan in the oven while the roast sat on the counter because I wanted to make sure that the potatoes would be cooked through by the time the roast was done baking.

Before adding the roast to the pan, I always brown/sear it.  I feel it seals the juices inside the roast, and ensures a juicier end product.  But you can skip this step if you're pressed for time.

For side dishes, I cooked up some delicious cinnamon-honey glazed carrots, using the recipe from Food & Wine (carrot recipe link).  I also baked my buttermilk biscuit recipe, which I posted last month (biscuit recipe link). 


For wine, we chose a 2007 La Linda Malbec and a 2003 Proemio Cabernet Sauvignon, both from Mendoza, Argentina.  These are big, full-bodied red wines with plenty of spice, acidity, and tannins to handle the pepper and herb flavored roast.  Other great options would be a full-bodied Syrah or Merlot.  If we had a nice red Bordeaux on-hand, it would have been another good option.


The British Empire

I looked briefly at the history of the roast.  While I'm sure humans have been roasting cuts of bison, pigs, cows, and woolly mammoths for millennia, the modern 'roast' seems to be a British invention.  I read somewhere that roasts were a common Sunday meal because the bakery ovens, which were used for baking bread throughout the week, were available on Sundays because the bakeries were closed.  It is interesting to look at a map of British influence and where roasts are most commonly served.  Today, the UK, Ireland, Australia, New Zealand, the US, and Canada, which were all at one time under the control and/or influence of the British, are places you'll likely find roasts on the family menu.


Merry Christmas everyone!  Enjoy the holiday season and the time spent with friends & family.


Sirloin Tip Roast Recipe

Ingredients:
One 3 to 4-lb sirloin tip roast (or similar beef roast)
1 large onion, roughly chopped
2 to 3 lbs. potatoes, cut into bite-sized pieces
2 stalks celery, diced
1 medium carrot, diced
3 cups beef stock (you can substitute chicken or mushroom stock)
1/2 cup red wine
2 T. olive oil or rendered meat fat
Dried herb mixture (combination of rosemary, oregano, and thyme)
Dash of cayenne
Salt & Pepper


Directions:
1. Preheat oven to 350° F
2. Prep roast by rubbing salt, pepper, and herb mixture all over the outside
3. Leave roast on counter at room temperature for 25-30 minutes
4. Place vegetables in a large roasting pan, add salt, pepper, herb mixture, cayenne, and oil/fat.  Stir and place in the oven.
5. Bake, uncovered, for 25-30 minutes.
6. Add about 1 cup of stock to the pan (make sure there's always enough stock to fill the pan about 1/2" to 1" high)
7. Turn the oven down to 275° F8. Brown all sides of the roast in a large skillet, then add to the roasting pan.
8. Cover and bake for about 45-60 minutes.  It might need more time if it's a larger roast or if you prefer medium or medium well beef.  Use a meat thermometer, placing in the thickest part of the roast.  145° F for medium-rare, 160° F for medium, 170° F for well-done.


Saturday, December 11, 2010

Soup’s On: Mushroom

Mushroom Soup


Soup is polarizing.  For some, it is the highlight of the meal, the perfect dish to demonstrate a chef’s ability (or lack of ability), a light lunch, or simply a comfort food to warm up on a cold day.  For others, me included, soup is overrated.  Either it’s a bland, broth-based soup with mushy vegetables or it’s an indulgent, creamy soup that makes you feel guilty.  In a restaurant, I always opt for the salad.


Prepping all the mushrooms
However, even for non-soup people like me, a soup comes along every once in a while that is the perfect combination of flavor, texture, and even healthiness.  This soup recipe, which I adapted from F&W’s Wild Mushroom Soup, turned out very well.  My friends and I love its hearty texture and earthy flavors.  As I mentioned in my previous entry on Asian cuisine, this soup also has the umami component, which comes from all the mushrooms (which deliver this type of flavor). 

I also enjoyed cooking it because you have a lot of flexibility within the recipe.  If your grocery store or farmer’s market has a good variety of mushrooms, you can pick out whatever is on sale or whichever mushrooms you love to eat.  I used a combination of white, portabella, and shiitake mushrooms, along with the some unusual ones, such as trumpet and oyster mushrooms. 


Another flexible aspect of the soup recipe is its texture.  I pureed my most recent batch only once, which made it slightly chunky.  However, if you prefer a very smooth, completely homogeneous soup, you can puree the soup again after adding the stock and water.  The viscosity of the soup is also a variable, which you can change to meet your taste.


Fresh portabellas

The only other soup I enjoy as much as this hearty mushroom soup is a well-made, roasted tomato soup.  If you have a favorite soup recipe, please post it below and I'll try it out.


Enjoy!


Mushroom Soup
(serves 6-8 bowls of soup)

Ingredients:
1 T. olive oil
¼ lb. pancetta, chopped
2 pounds mixed mushrooms, stemmed and thinly sliced
2 medium shallots, finely chopped
1 tsp fresh thyme, minced
¼ tsp fresh sage, minced
¼ tsp fresh rosemary, minced
¼ cup Marsala
2 T. Sherry
¼ cup heavy cream
1 quart mushroom stock (or low-sodium chicken stock)
2 cups water
Salt and freshly ground pepper
Chives, minced (for garnish)


Directions:
1. In a large pot, heat the olive oil
2. Add the chopped pancetta, cooking until it’s golden brown, 5-7 minutes
3. Remove pancetta and place on a plate with a paper towel to absorb the oil (but do not clean out the oil in the pan)
4. Add mushrooms to the pot, along with salt & pepper
5. Sauté until mushrooms cook down, about 10 minutes
6. Add the shallots and fresh herbs, stir, and let cook for 3-4 minutes
7. Add the Marsala and Sherry, stir, and let it reduce by half
8. Add heavy cream and return crispy pancetta to the pot; turn off heat
9. Using a food processor, blend the mushroom mixture into a fairly smooth consistently (or more to your preference)
10. Return the pureed mushroom mixture to the pot, add the stock and water
11. Bring to a boil, then reduce heat to low and let cook for another 10-15 minutes, or until the soup reaches your desired consistency
12. Serve with fresh minced chives